
Avid fisherman will know how to tie a variety of different knots depending on the type of fishing that they are doing. You can have the best performance gear in the world but if you don’t tie your hook on properly, your trophy fish will get away. Experienced fishermen are probably familiar with the fisherman’s knot, also known as the “improved clinch knot,” as it is often the first knot that they learn to attach a hook to a fishing line.
There are a few basic terms to understand when learning how to tie a knot. These terms are self-explanatory, but just to be clear, they are defined here:
- Tag End: The end of the line. This is the part of the line that does the knot-tying.
- Standing line: The remainder of the line that runs up toward the reel.
- Turn: Also called a “wrap,” this is when a turn occurs when you pass the tag end completely around the standing line.
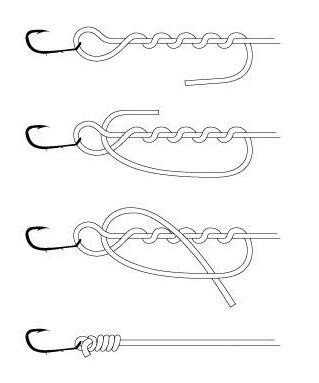
To accurately tie a fisherman’s knot, follow these steps:
- Run the tag end of the line through the eye of your hook. Pull anywhere from 8-10 inches of line through the eye.
- Wrap the tag end around the standing line 5 times.
- Now pass the tag end through the loop next to the hook eye. This will now create another loop that includes your wraps.
- Pass the tag end through the new loop.
- Wet the loops with some saliva to lubricate the knot.
- Holding the tag end and standing end in the same hand, and the bend of the hook in the other, pull on the lien with steady pressure.
- Tighten your knot slowly.
- Once the knot is tight on the end of the hook, clip the remaining tag line, leaving only 1/8 inch.
A fisherman’s knot is dependable and super easy to add to your knot tying arsenal. The next time you pack up your performance gear and head out to your favorite fishing spot, try your hand at tying the fisherman’s knot!
Man this is so helpful
Perfect! Now I won’t have to have my dad tie it for me every time 🙂
Thanks so much Nikki, a real favourite here 🙂custom writing service